RUOMEI / BUYER’S GUIDE
Neon and Light Box Combinations: Decide What the Face and Lines Should Do
A light box and LED neon can be combined in one sign. The useful starting point is a marked-up logo: show what belongs on the graphic face and what should become a glowing line. Adding neon to every detail is not always the right brief.
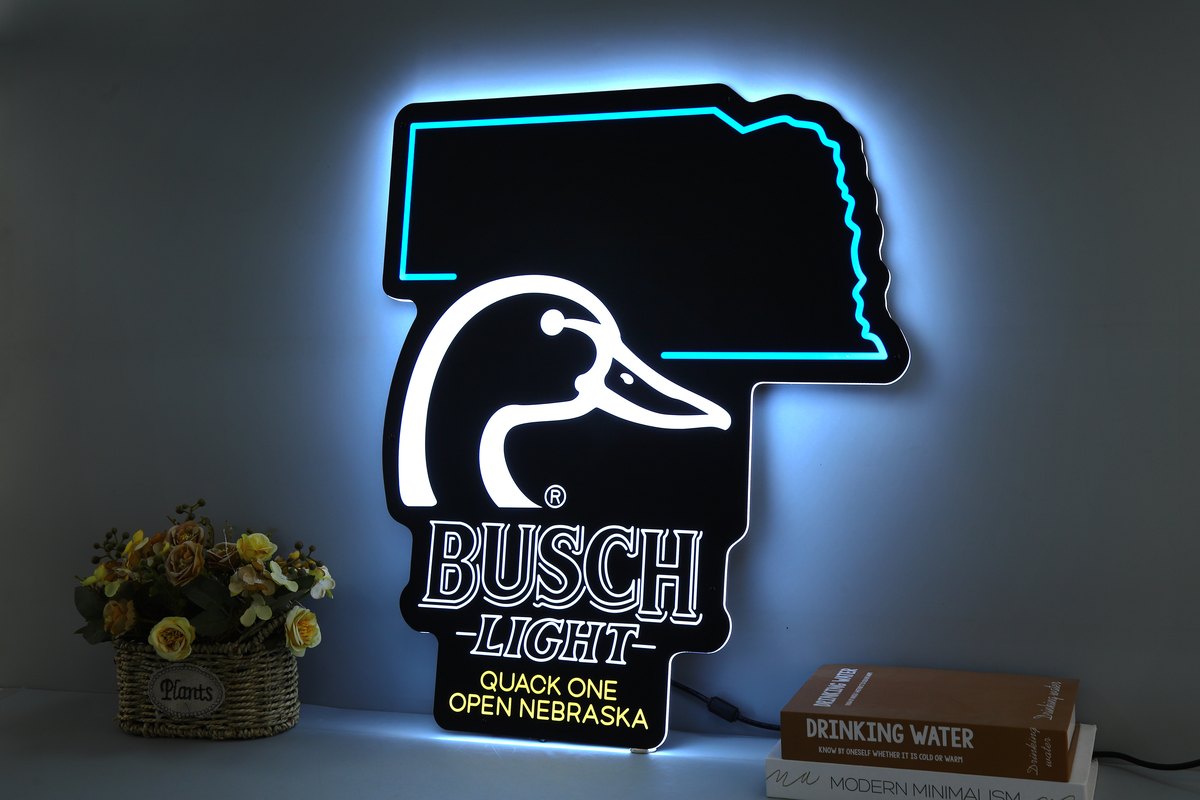
A real product example showing a graphic face and luminous outlines. The photograph shows appearance, not the internal wiring or an animation sequence.
1. Mark the artwork before choosing the construction
On a copy of the logo, mark the printed or graphic areas separately from the lines you want to illuminate as LED neon. Identify any areas that should stay dark. Keep the original artwork unchanged so there is a clear reference for the brand design.
A supplier should not have to guess whether a coloured border is part of the printed face or a separate light effect. That decision affects the proposed construction and the sample you approve.
2. Give the face and the lines different jobs
| Part of the design | What to specify | What to review |
|---|---|---|
| Graphic face | Artwork, colours and areas intended to illuminate. | Whether the complete graphic reads as intended. |
| LED neon lines | The selected outline, lettering or accent. | How those lines sit with the graphic at the agreed size. |
| Dark areas | Parts that should not light up. | Whether the intended contrast is retained. |
For example, a brief might keep an illustrated background on the face and reserve neon for the main name or border. This is a design direction to review, not a requirement to convert every stroke into neon.
3. Use the combination when both effects matter
This direction is worth reviewing when the brief calls for a complete graphic and a distinct line-glow effect in the same display. If a straightforward illuminated face already delivers the intended result, ask whether the added lines serve a clear purpose.
Compare the same artwork and size with and without the proposed accent. Look at the main name, smaller text and overall balance. There is no universal price, brightness or durability advantage simply because a sign combines two lighting approaches.
4. Describe any movement as a sequence
RUOMEI can review light box and LED neon combinations with customised flashing effects. State which area stays on, which area changes and the order of the changes. A short reference video helps, but explain the exact behaviour you want from it.
Do not assume every combination includes animation or separate control of each part. The sequence, controls and electrical configuration need to be agreed for the project. A still photograph cannot demonstrate those functions.
5. Approve the complete display effect
Review the sample from the intended viewing distance and under the agreed ambient lighting. Check that the accent does not make important wording difficult to read. For a moving effect, review a full sequence rather than approving one attractive frame.
Also confirm the overall dimensions, depth, mounting and cable exit. If access for servicing or graphic replacement matters, raise it before the structure is approved. Those features depend on the construction; they are not automatic benefits of a combination sign.
6. Send one annotated reference with your enquiry
Send the logo or reference image, target size and quantity. Add the marked-up copy showing the face, neon lines and dark areas. If you need a flashing effect, include the sequence reference as a separate part of the brief.
We can review the construction through our custom LED light box options. You do not need to design the internal wiring yourself. The next step is to agree what the sign should look like and do, then confirm how it will be made.
FROM YOUR BRIEF TO THE NEXT STEP
Send us what you have so far.
A logo or reference photo, size and quantity will get us started. Include any questions about the design or installation.
Tell us about your project
Use the message field to describe your artwork and requirements.