
RUOMEI / BUYER’S GUIDE
Wall-Mounted or Hanging Light Boxes: Choose the Position Before the Product
Start with where customers will see the sign. A wall-mounted light box can suit a clear front view; a hanging layout can place the message away from the wall. Neither choice settles the number of illuminated faces, the fixing method or the power route.
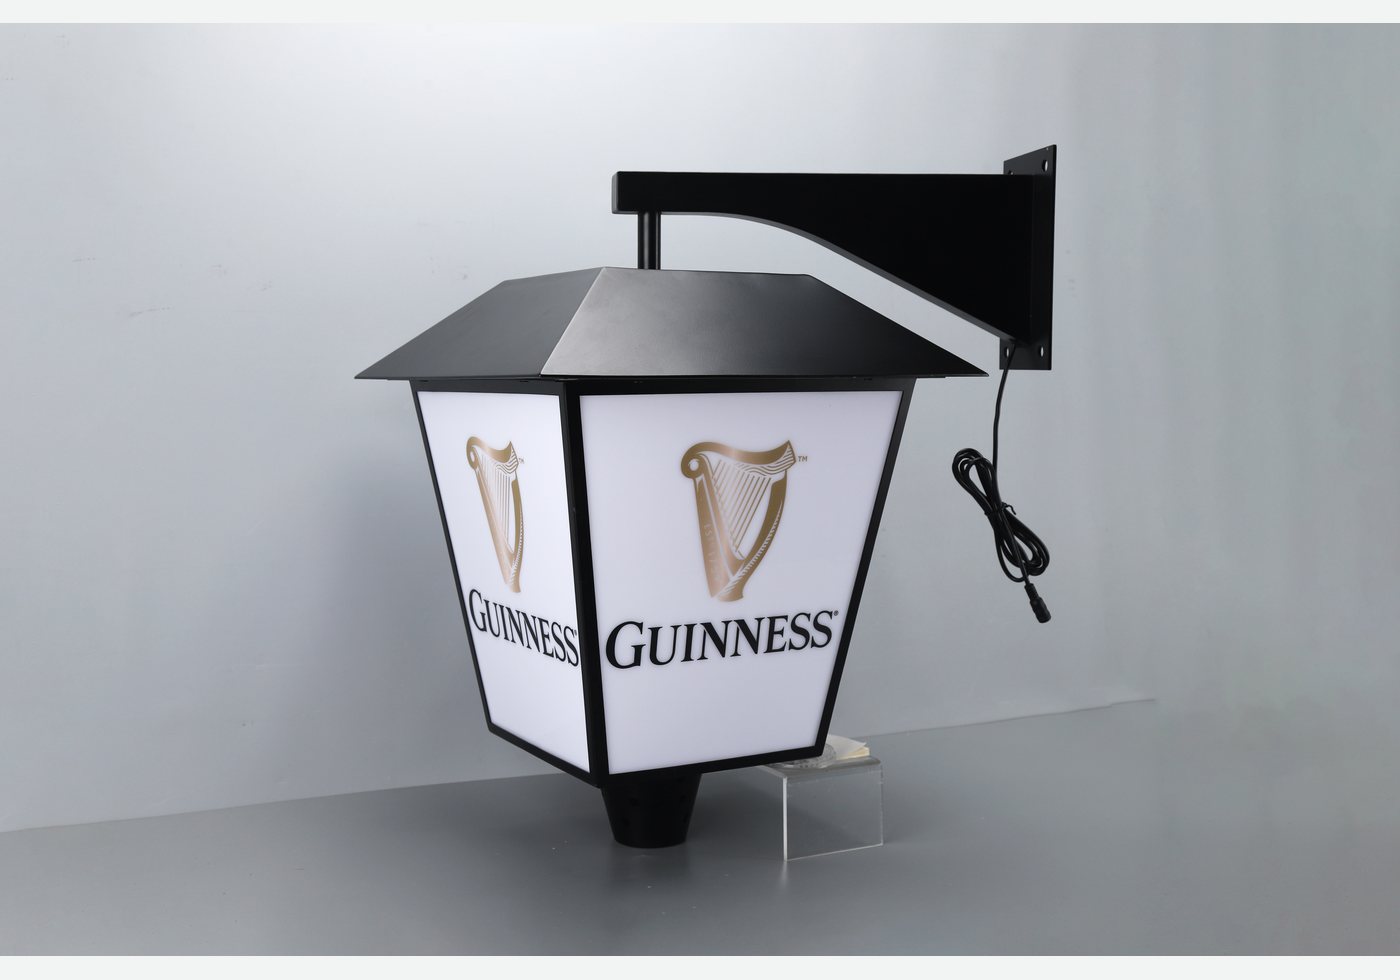
A bracket-supported product example: the fixing plate attaches to a wall while the display projects outward. This is not a ceiling-suspension example or an installed customer site.
1. Draw the viewing direction first
A sign behind a reception desk and a sign above a shop aisle answer different questions. One identifies the business when a visitor faces the desk; the other needs to be found while people move through the space.
Send a wide photograph of the location, mark the proposed position and add arrows showing the approach directions. Include shelving, doors and other signs. A close-up of an empty wall leaves out the objects that may block the message.
If people need to read the sign from opposite sides, state that explicitly. “Hanging” describes support and position. It does not automatically mean two illuminated faces.
2. Compare three layouts, not just two labels
| Layout | When to consider it | What must be checked |
|---|---|---|
| Flat against a wall | The intended audience faces the wall. | Available area, wall construction and cable route. |
| Suspended from above | The message needs to sit away from a wall or above a display. | Approved support points, drop, visible rear and access. |
| Projecting from a wall bracket | The display needs to extend into a side approach view. | Projection space, wall support and required viewing faces. |
The photographed lantern uses the third arrangement. Calling it simply “hanging” could lead a buyer to expect ceiling wires instead of a wall bracket. Put the intended support method into the brief.
3. Measure the complete installation space
Give the available width and height, then separate the display body from its support. For a suspended layout, also describe the distance from the support to the proposed top of the sign. For a bracket layout, show how far the complete assembly may project.
Do not treat the artwork width as the finished installation width. Frames, brackets and cable space need to be shown in the proposal. Ask your installer to confirm the support surface and suitable fixings; a product photograph cannot establish the load capacity of your wall or ceiling.
For several stores, record exceptions before grouping quantities. The same logo may need different installation configurations.
4. Leave a route for power and future access
Mark the outlet or planned supply point in the same location photo. Tell us which side should conceal the cable and where the power supply can remain accessible. A clean front view is not enough if the proposed cable route crosses the display.
Also explain how someone will reach the sign after installation. If graphics need to change, include that requirement before choosing the construction. Do not assume every sealed-looking or slim product opens in the same way.
RUOMEI reviews cable exits, power supply arrangements, installation and servicing requirements by project. An exposed or outdoor position needs its own review; the mounting style is not a weather rating.
5. Make the installation scope comparable
Ask each supplier to identify the sign body, supports, supplied accessories and items left to the installer. If an offer lists a bracket, request the proposed drawing rather than assuming it matches a reference photograph.
Keep the artwork, overall display size, use environment and required faces consistent when comparing alternatives. A higher or lower total cannot be explained by “wall-mounted” or “hanging” alone. The complete configuration is what you are buying.
6. Send the location with the logo
- Logo or reference design, intended size and quantity.
- Wide location photo with approach directions marked.
- Preferred layout: flat wall, suspended or projecting bracket.
- Available installation space and proposed power point.
- Indoor or outdoor conditions, access needs and store-by-store differences.
If the layout is undecided, say so. Send the location first and we can review a suitable direction for your custom LED light box before the detailed configuration is agreed.
FROM YOUR BRIEF TO THE NEXT STEP
Send us what you have so far.
A logo or reference photo, size and quantity will get us started. Include any questions about the design or installation.
Tell us about your project
Use the message field to describe your artwork and requirements.